Seed Box Fleet Management
Solving a Growing Problem For Commercial Farms
Farms provide an essential service to the world. Billions of people rely on farms for their food and businesses rely on partnerships with farmers to create their products.
In short, farmers are vital to the US economy, but they don’t provide this service alone. Farmers rely just as much on others as they themselves are relied upon. One growing example of this reliance is the use of portable containers for the storage and management of seeds.
How Are They Used?
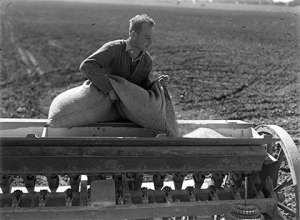
Filling a seed drill from a seed bag. Image by Ron C. Blackmore.
Seeds boxes are used in the transportation, storage, and planting of seeds.
Prior to the invention of seed boxes, seeds were transported and stored in 50lb or 2500lb bags. And while some packaging is still done in bags, it’s not an ideal way of handling bulk seeds.
Farmers prefer seed boxes because they are easier to handle and more efficient during planting and storage. Once you open a bag of seeds, you have to use it all. But with boxes, unused seed can remain safely stored until needed.
Various Seed Containers & Ag Bins
So far we’ve discussed only one type of bin, the seed box. But a quick overview of the other common seed containers used by modern farms should further explain the role of seed boxes in relation to other seed and agricultural bins, and ultimately to a better understanding of the most effective methods to manage a seed box fleet.
Seed Bins
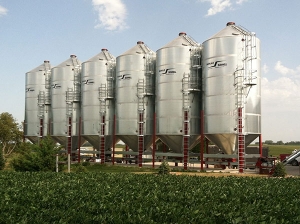
The term “seed bin” is frequently thrown around to describe a variety of agricultural bins, including seed boxes. But on farms, the term “seed bin” typically refers to one or more large, metal storage containers with cone bottoms. They are used for seed storage in extremely large quantities.
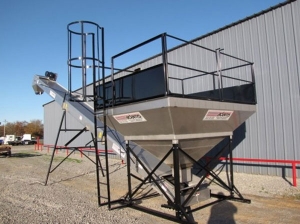
Seed Hopper
Seed Hoppers
Seed hoppers are basically small seed bins. They typically taper down allowing seeds to discharge from the bottom.
Large seed hoppers are usually metal, while smaller hoppers are typically plastic. The smaller size allows them to be transported more easily and mounted on farm equipment when needed.
Seed Boxes
The term “seed box” is used to describe a variety of different seed-related containers.
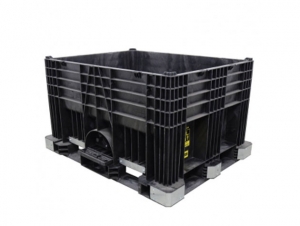
Modern Seed Box
In the 19th century, wooden seed boxes were used to display seed packets adorned with seed company labels. These boxes provided retail advertising at the point of sale. Wooden consumer seed boxes still exist, but are primarily used by home gardeners.
Conversely, seed boxes on modern commercial farms are large, pallet sized containers capable of holding hundreds of pounds of bulk seed. They are typically made of thick, rugged, industrial plastic.
Gaylord Boxes
A gaylord box is another term used interchangeably with bulk bin, skid box, pallet box, or seed box. They are used for transporting items in bulk and are typically the size of a pallet.
The term Gaylord is a trade name in the United States and Canada because it refers to the Gaylord Container Company which was the first to manufacture this type of box in North America.
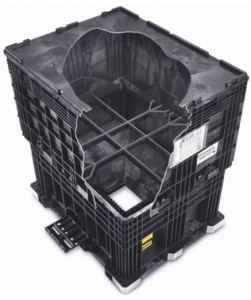
Center Flow Seed Box
Center Flow Seed Boxes
Of all the boxes we’ve reviewed, the Center Flow seed box offers the most innovative and tailored design to store and dispense seeds and other pellet sized materials.
As you can see in the included image, the Center Flow seed box has a hopper bottom with a 35˚ angle allowing materials to efficiently flow through it. The unique design offers the ability to store and dispense seeds from the same container.
They are made HDPE plastic which is lightweight, rugged, sturdy, and affordable.
If damaged, these seed boxes can be repaired with modern plastic welding or recycled if necessary.
Seed Storage & Transportation
Seed boxes serve two main purposes; transportation and storage.
While transportation is important, seed storage presents a much more challenging problem since seeds lose viability over time.
Therefore, the following section provides a deep dive into seed storage to tackle this challenge.
Seed Storage 101
Seeds are a vital component of a healthy, profitable farm. In 2018, farms in the United States spent $22 billion on seeds, a 30% increase since 2010. Therefore, proper seed storage is equally important.
Here are some important considerations for proper seed storage.
Short Term Seed Storage
The first and most important consideration for effective seed storage is the length of time that you intend to store the seeds. Less than a year is typically considered short term.
A wide variety of materials exist for short term seed storage including cotton, burlap, multi-wall paper, plastic, and polyethylene bags. These materials are usually porous and are used to simply keep the seeds from mixing together. However, these materials do not provide protection from moisture and therefore, should not be considered for long term seed storage.
If you’re planning on storing your seed for over a year, then you’ll need to consider long term seed storage.
Long Term Seed Storage
When storing seeds for an extended period of time (longer than 1 year), there are several factors that contribute to the viability and vigor of seeds. Viability refers to the percentage of seeds that germinate upon planting. Vigor, on the other hand, refers to the rate at which seeds germinate and grow in the early stages, which helps seedlings overcome disease, weeds, and pests.
When storing seeds long-term, the goal is to maintain the highest level of viability and vigor
Temperature
Depending on the type of seed, the optimal temperature can widely differ. The general effect of temperature on longevity is that longevity increases as temperature decreases. This is true of even subfreezing temperatures as long as the moisture content of the seeds is below 14% (so ice crystals don’t form).
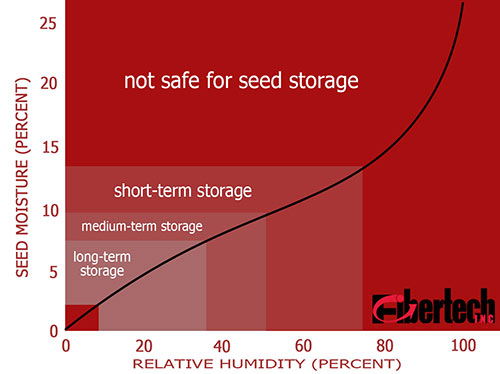
General Moisture & Humidity Guidelines
Moisture & Humidity
Seed moisture affects the viability of seeds more than temperature. This is why newly harvested seeds undergo a drying process, because it preserves the viability of the seeds in long-term storage. As moisture and humidity increase, fungi and other microorganisms begin to rapidly deteriorate the seed viability.Fortunately, there are “rules of thumb” that you can follow to ensure the maximum viability of your seeds in long-term storage. We’ve included a graphic that illustrates these rules.
Ventilation
Some seeds may do best when stored in a container with adequate ventilation. Others may suffer because of it and will need to be sealed in an air-tight container. The most important factor affecting the need for ventilation is the moisture content of the seeds. But at a minimum, seeds should always be kept dry.
Illumination
The effects of light on stored seed have been studied (including the effects of different wavelengths of light): Some studies showed a benefit and some showed a detriment: the results are inconclusive and
controversial.
Seeds stored in glass containers should be stored out of direct sunlight because of the localized “greenhouse heating effect” on seeds. This might seem an unnecessary and overly obvious cautionary note, but in my experience, it has happened accidentally more than once. For example, this can happen if jars of stock seed are taken outside for the purpose of removal of some seeds for planting, or for transporting to another location. Though the jar may be temporarily stored in the shade, the angle of sunlight may change quickly and the jar will be in direct sun causing very rapid heating within the jar.
Though some commercially produced seed is dried in direct sunlight (in dry climates), drying seeds in the sun is a questionable practice in the Mid-Atlantic and South if the air temperature is above 90oF (32oC).
The air temperature at the seed surface is higher because of the conversion of light energy into heat at the seed surface, and the heat is “moist heat” (though this wouldn’t be an issue in dry climates where evaporative cooling occurs at the surface). I’m not aware of any studies on this issue for our region.
Another concern, also not well documented, is that the ultraviolet light from the sun may have a deleterious effect on seed longevity while the seeds are drying (Harrington, 1972). Harrington’s suggestion was based on the known effects of ultraviolet radiation on biological systems (rather than specific data). Whether the ultraviolet exposure is long enough to cause concern, is unknown.
Fungus, Bacteria, & Insects
The process of seed harvest and cleaning removes most debris and insects, but certain fungi, bacteria, and insects make their way into stored seed. Fortunately, the same conditions that are favorable to seed preservation inhibit fungi and bacteria and kill insects.
Bacteria — Bacteria do not have a significant role in seed deterioration because free water is required for bacterial growth, and if the moisture content of the seed is high enough to support bacteria, the seed is more likely to succumb to deterioration due to other causes such as fungi, respiration, heating or premature sprouting.
Fungi — Most seed storage fungi are inhibited when the relative humidity is kept below 65%. At this relative humidity the moisture content of starchy seeds is about 13%, and oily seeds about 7%. The major effects of fungi are to:
- decrease viability;
- produce toxins that affect seed viability and germination;
- increase heat production – important in large seed lots; and,
- cause discoloration, mustiness, and caking.
Insects — In hot, humid climates such as the Mid-Atlantic and South, mites, weevils, flour beetles, and borers can be a serious problem in stored seed, but if the seed is dried to 8% moisture content and the temperature reduced to (64 to 68oF (18 to 20oC), insects should not be a problem. At a moisture content of 15% and a temperature of 86 to 95oF (30 to 35oC), they can become very destructive. Mites will not survive when the relative humidity is below 60% (Bewley and Black, 1985).
So… How Long Do Seeds Last?
Some seeds have a longer life expectancy than others, but most last for a couple of years if stored in a dry, cool place. Some varieties of tomato seeds have even been known to germinate after as long as 16 years!
Seeds are living things and their viability is affected greatly by the way they are stored. Most experts agree on dark, cool, and dry conditions as being the best.
But seed viability also varies based upon type. Here are some common seeds and their viability.
Common Seed Lifespan
Asparagus – 3
Bean – 3
Beet – 4
Broccoli – 3
Brussels Sprouts – 4
Cabbage – 4
Carrot – 3
Celeriac – 3
Cauliflower – 4
Celery – 3
Chard, Swiss – 4
Chicory – 4
Collards – 5
Corn, Sweet – 2
Cucumber – 5
Eggplant – 4
Endive – 5
Fennel – 4
Kale – 4
Kohlrabi – 3
Leek – 2
Lettuce – 6
Muskmelon – 5
Mustard – 4
Okra – 2
Onion – 1
Parsley – 1
Parsnip – 1
Pea – 3
Pepper – 2
Pumpkin – 4
Radish – 5
Rutabaga – 4
Salsify – 1
Spinach – 3
Squash – 4
Tomato – 4
Turnip – 4
Watermelon – 4
How to Test Seeds To Determine Viability
Let’s say you have some seeds that are a couple of years old and you’re not sure if they’ll germinate, even if they’ve been stored under optimum conditions in a dry, cool place.
You can test the seeds a few weeks before planting time by taking several seeds, placing them on a moist paper towel, covering it with plastic and placing it in a warm spot. Check back in a week or so and if you have sprouts you’ll know the seeds are viable.
Managing a Seed Box Fleet
Now that you have a firm grasp on seeds, seed boxes, and seed storage… let’s dive into some best practices for seed box fleet management.
Washing & Scrubbing
It’s essential that you clean and disinfect seed boxes between each use to prevent seedling blight, a soil borne disease that attacks and kills seedlings. Seedling blight, also known as damping off, lives in the soil and can survive in dirty seed boxes year after year. The good news is that damping off is easily preventable.
If you’re only washing a few boxes, then follow the instructions below. If you’re washing dozens, consider our Seed Box Express Wash program.
Supplies Needed:
- A large bucket or plastic bin
- Paper towels or a small cleaning brush
- Bleach
- Dish soap (optional)
Instructions:
Step 1: Wipe the loose dirt out of the boxes using a paper towel or small cleaning brush.
Step 2: If there’s any dirt that is hardened on, soak the boxes in warm soapy water. You don’t have to be super fussy in this step, but it’s a good idea to remove as much dirt as possible.
Step 3: Disinfect the boxes by soaking them in a bleach and water solution (1 part bleach to 9 parts water) for 15-20 min.
You can use a five gallon bucket to disinfect seed cells and trays, but keep in mind that you’ll have to flip the plant trays over in order to disinfect both ends.
Step 4: Once they’re done soaking, give them a quick rinse and let them air dry.
Now they are sterilized and ready to go back into production.
Repairing Broken Seed Boxes
Repairing broken seed boxes may seem impossible, but modern advances in plastic welding provide the opportunity to repair every part including the hit plates, latches, runners, hand-holds, ring cross-members and lids.
And the cost of repairing a seed box pales in comparison to buying a new one.
Take a look at our Seed Box Repair service for more info.
Seed Box Recycling
Seed boxes beyond repair can, fortunately, be recycled. The plastic is ground-up and used for other plastic products.
Fibertech offers seed box repair AND recycling. So give us a call if you’d like some help with your seed box fleet.
STREAMLINE YOUR SEED BOX FLEET MANAGEMENT
Fibertech provides Wash, Repair, Reuse, & Recycling Solutions for Agriculture Seed Boxes. Contact us today for help!

